opencv
python
scikit-learn
Automatic chess move recognition
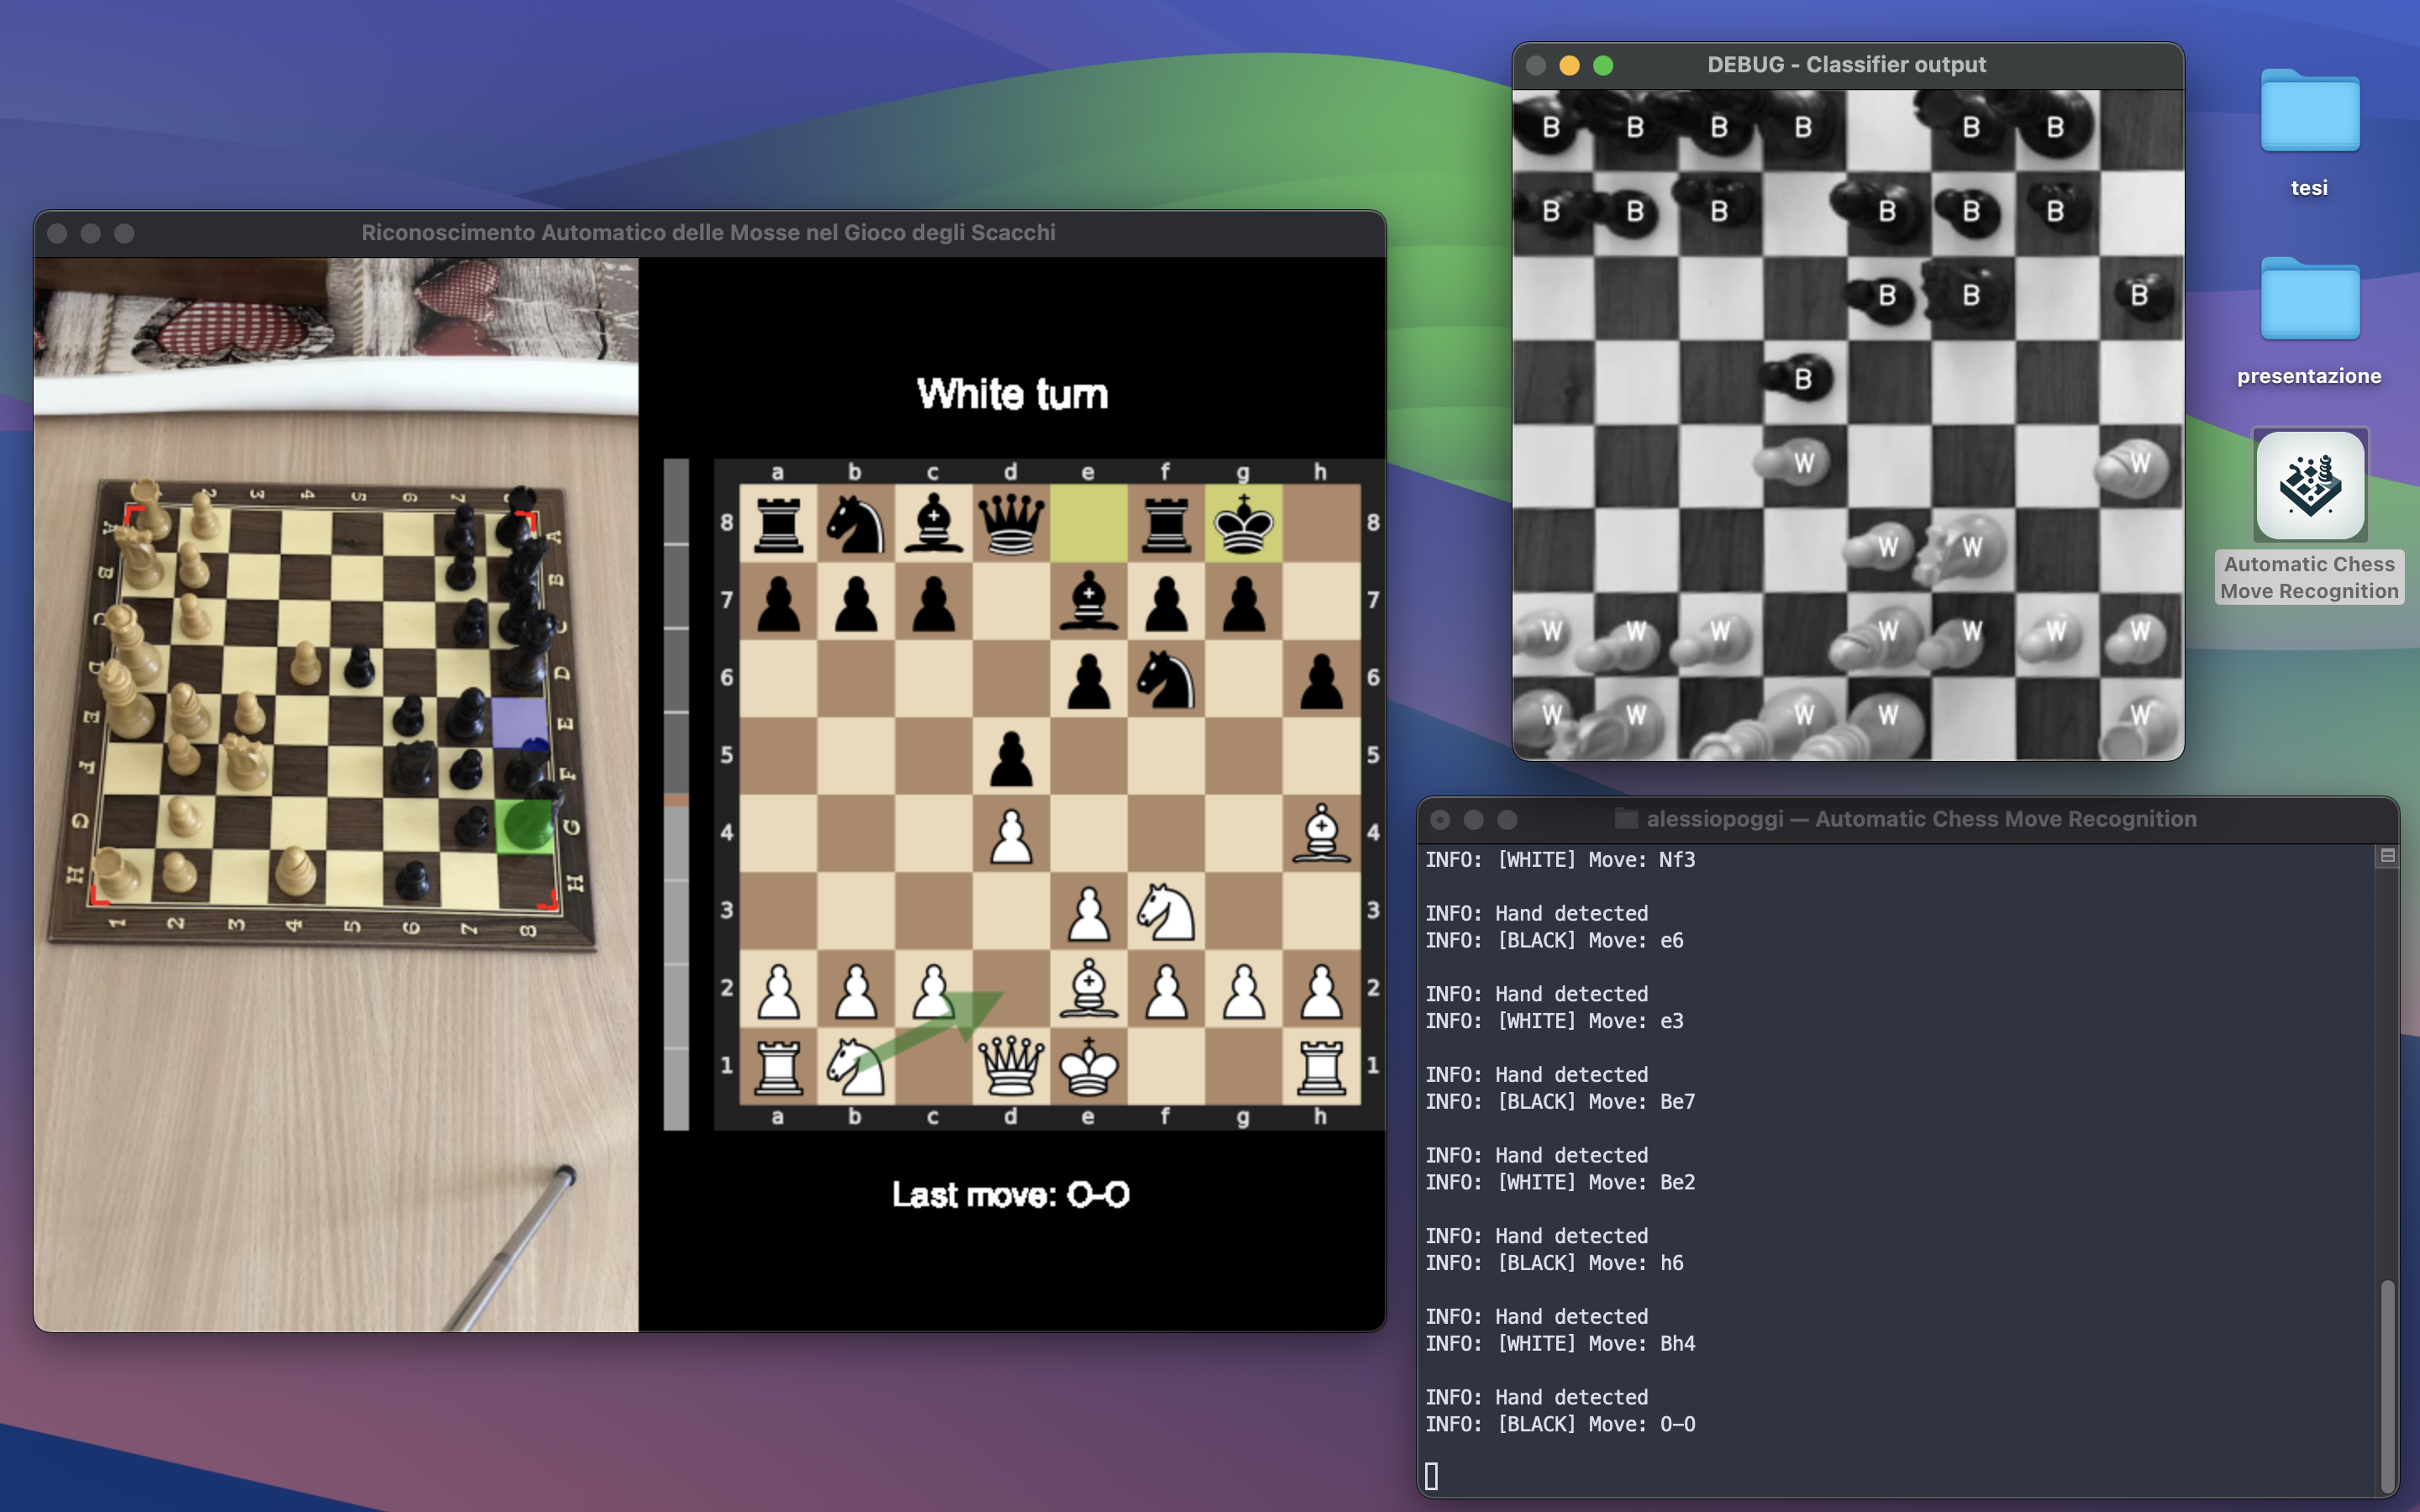
A Python program that uses a camera to detect chess moves on a physical board. It enables two players to track their game or play against a chess AI. The program processes images to recognize piece movements and updates the game state in real-time, bringing a seamless blend of physical and digital chess interaction!
🎯 Motivation and Objective
This project aims to develop a system capable of recognizing chess moves played on a physical chessboard using a camera or webcam. The ultimate goal is to allow users to play a game against a chess engine on their own board or to record the moves of a two-player game, whether it’s a live match or a video recording.
The initial idea was to develop the project using Hall effect sensors connected to an Arduino or Raspberry Pi. However, as the project evolved into my university thesis, it shifted towards a more software-driven approach, incorporating some machine learning techniques.
📚 Stack
- Python - A high-level, general-purpose programming language
- OpenCV - An open-source computer vision library for image and video processing
- Python-chess - A Python library for handling chess rules, move validation, and AI integration
- Scikit-learn - A machine learning library for data analysis and predictive modeling
- Others: NumPy, Pandas, Matplotlib, Seaborn, SciPy, Joblib, CairoSVG and Stockfish.
📌 Project Phases
-
Calibration and Orientation
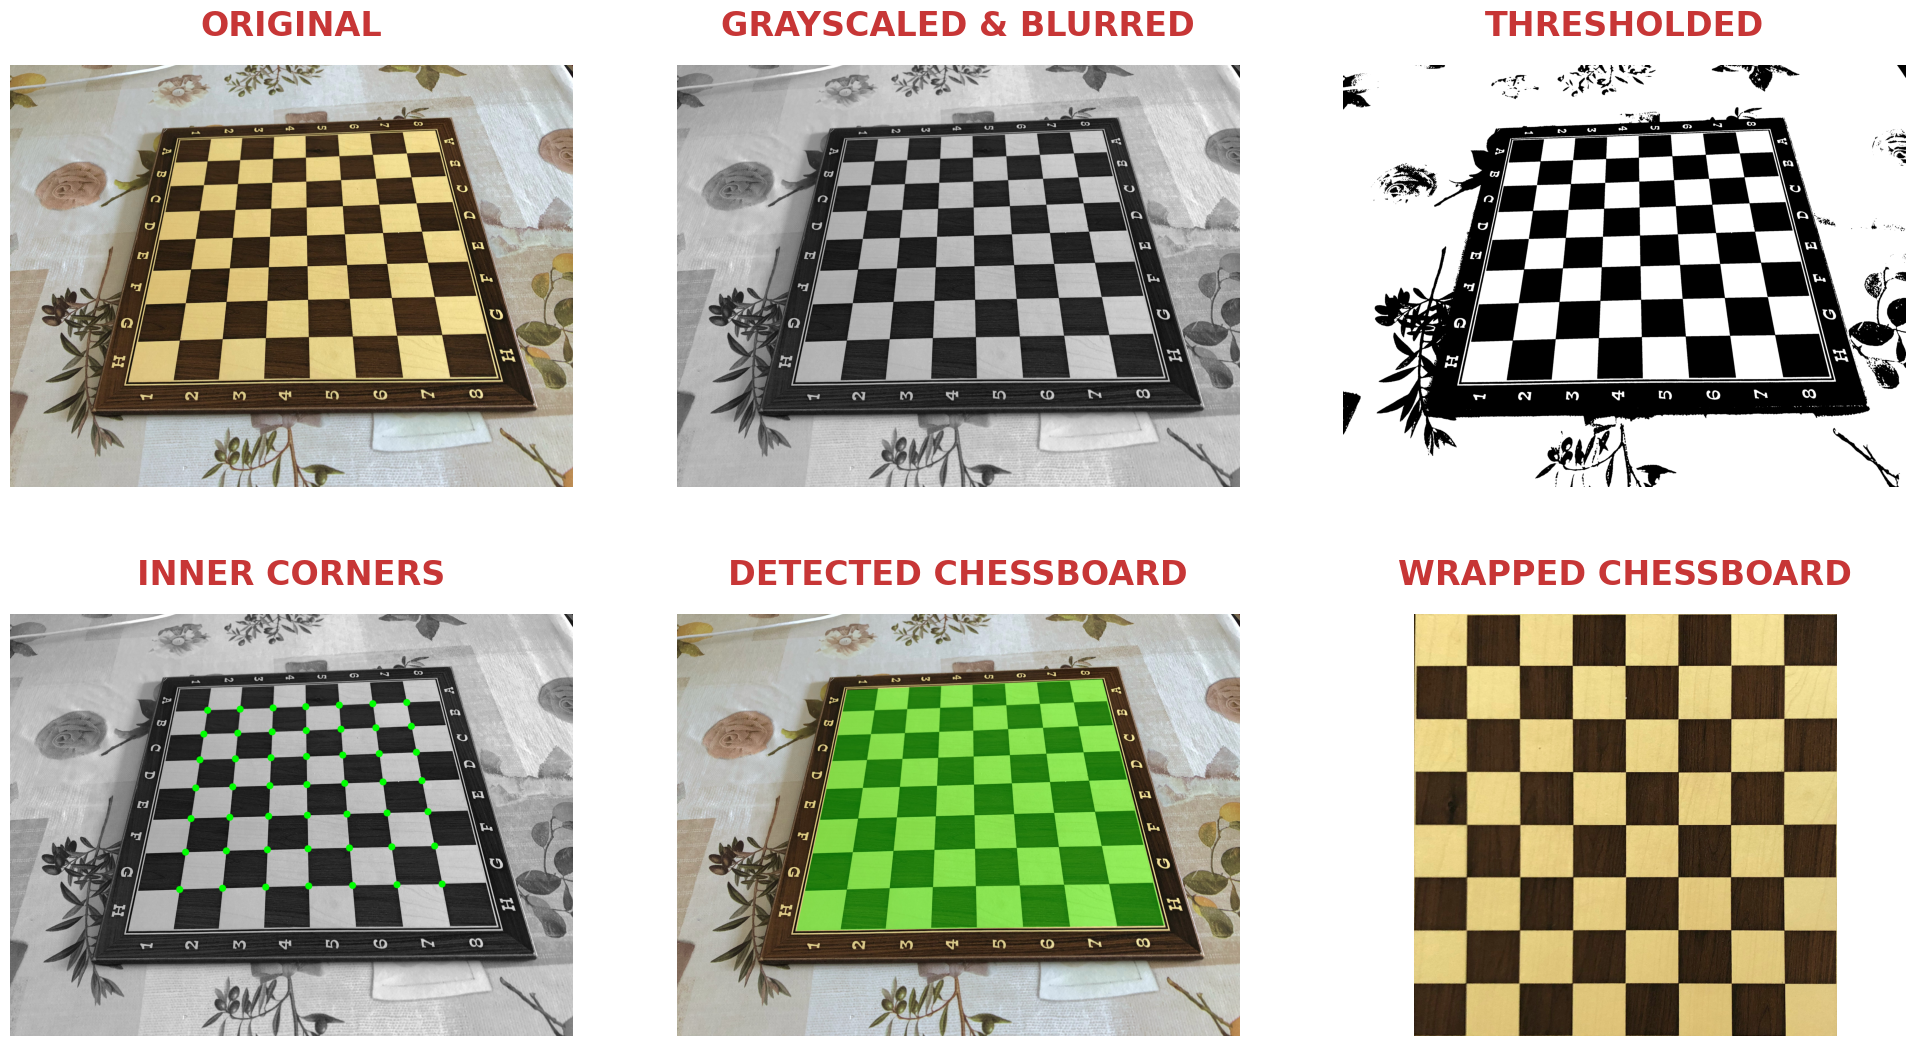
In this phase, the goal is to detect and isolate the chessboard within an image. From now on, we will refer to images or frames, as a video is simply a sequence of images.
To achieve this, we use an OpenCV method called findChessboardCorners(), which identifies patterns in an image, the intersection points of a series of horizontal and vertical lines, forming a grid. The 49 detected points are highlighted in the bottom-left image.
Using these points, we can define the plane containing the internal area of the chessboard. Finally, using another OpenCV method called findHomography() we can compute the transformation that maps the detected inner chessboard corners to a predefined set of points. This transformation corrects perspective distortions and allows the chessboard to appear as if viewed from above. By applying the resulting homography matrix to the original image we obtain the final adjusted image shown in the bottom-right.
Once the calibration is complete, the players will proceed to place the pieces on the chessboard. Afterward, the program will be notified via user input, and before the game begins, it will use the classifier to determine which sides of the board contain the white and black pieces. This way, the algorithm will know precisely how the board is oriented and the color of each relevant square for the upcoming steps.
-
Image Pre-Processing
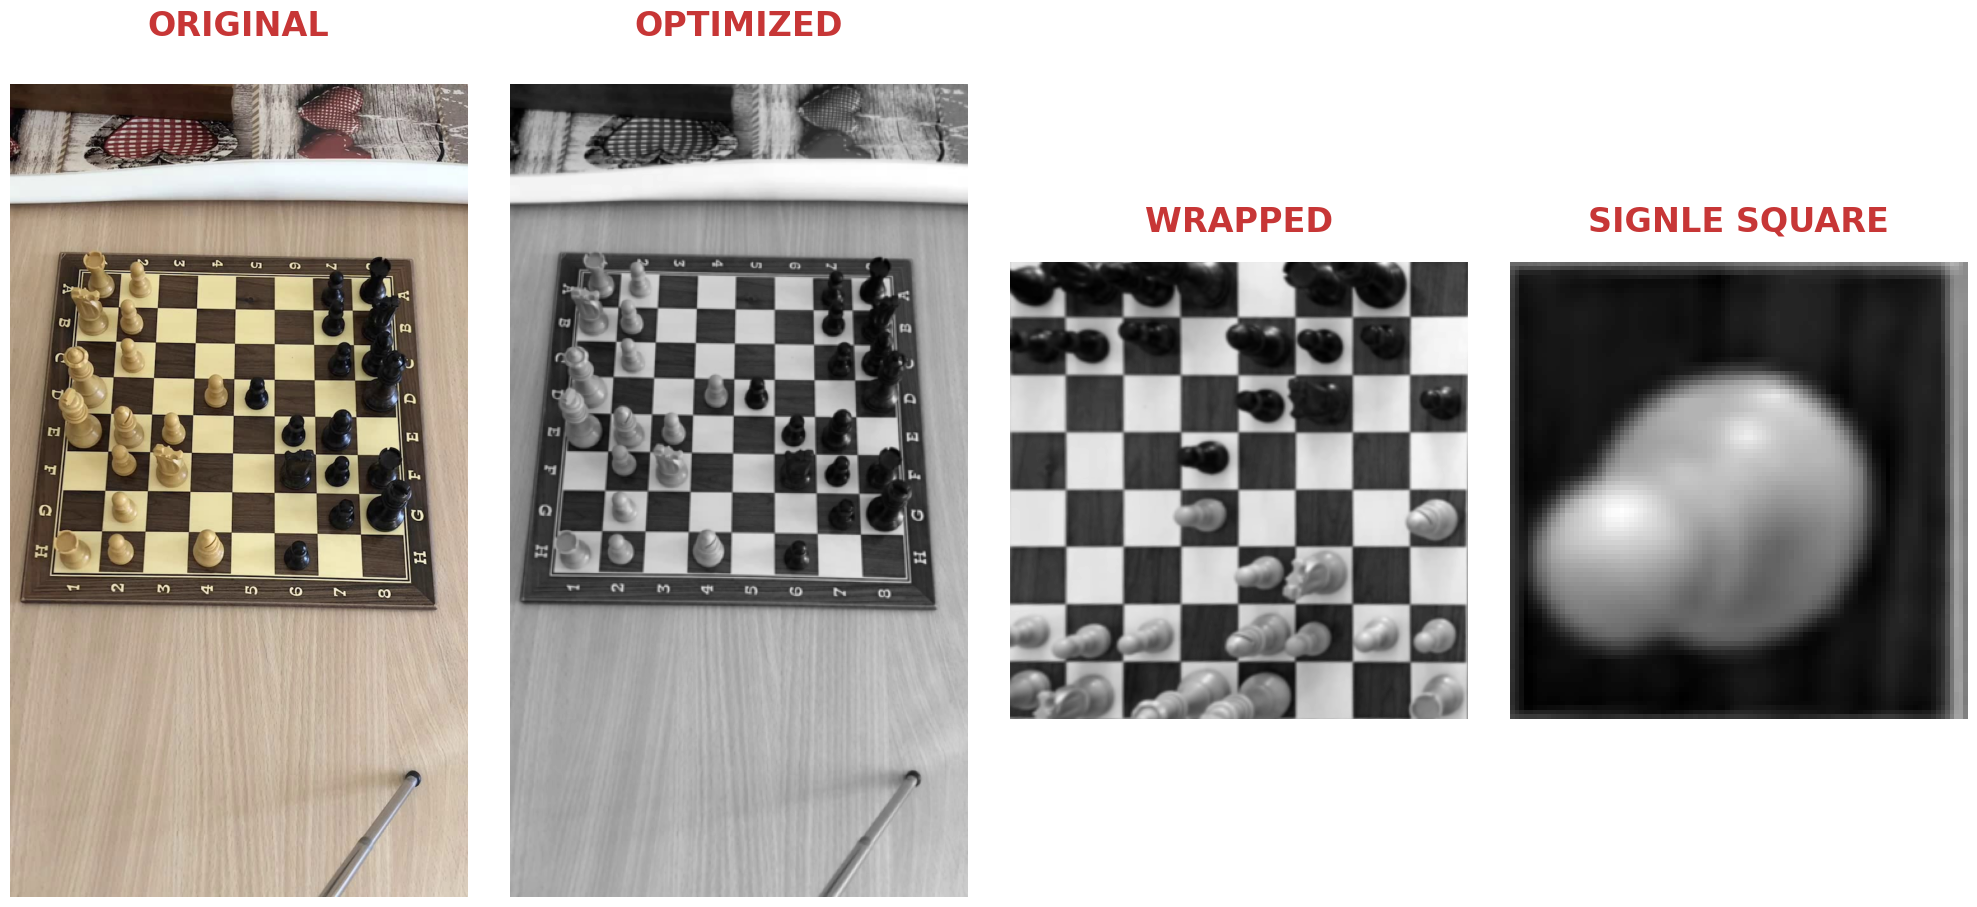
After calibration, every new frame captured by the webcam undergoes a series of transformations to optimize processing speed and accuracy. First, the image is scaled down by 50%, reducing both its size and resolution. This step minimizes computational load, making subsequent operations faster. Additionally, the frame is converted to grayscale, simplifying image analysis by removing unnecessary color information.
Once these pre-processing steps are applied, the perspective transformation determined during calibration is used to warp the image, aligning the chessboard into a fixed, top-down view. With this corrected perspective, it becomes straightforward to extract and isolate each individual square of the chessboard for further analysis.
-
Hand Detection
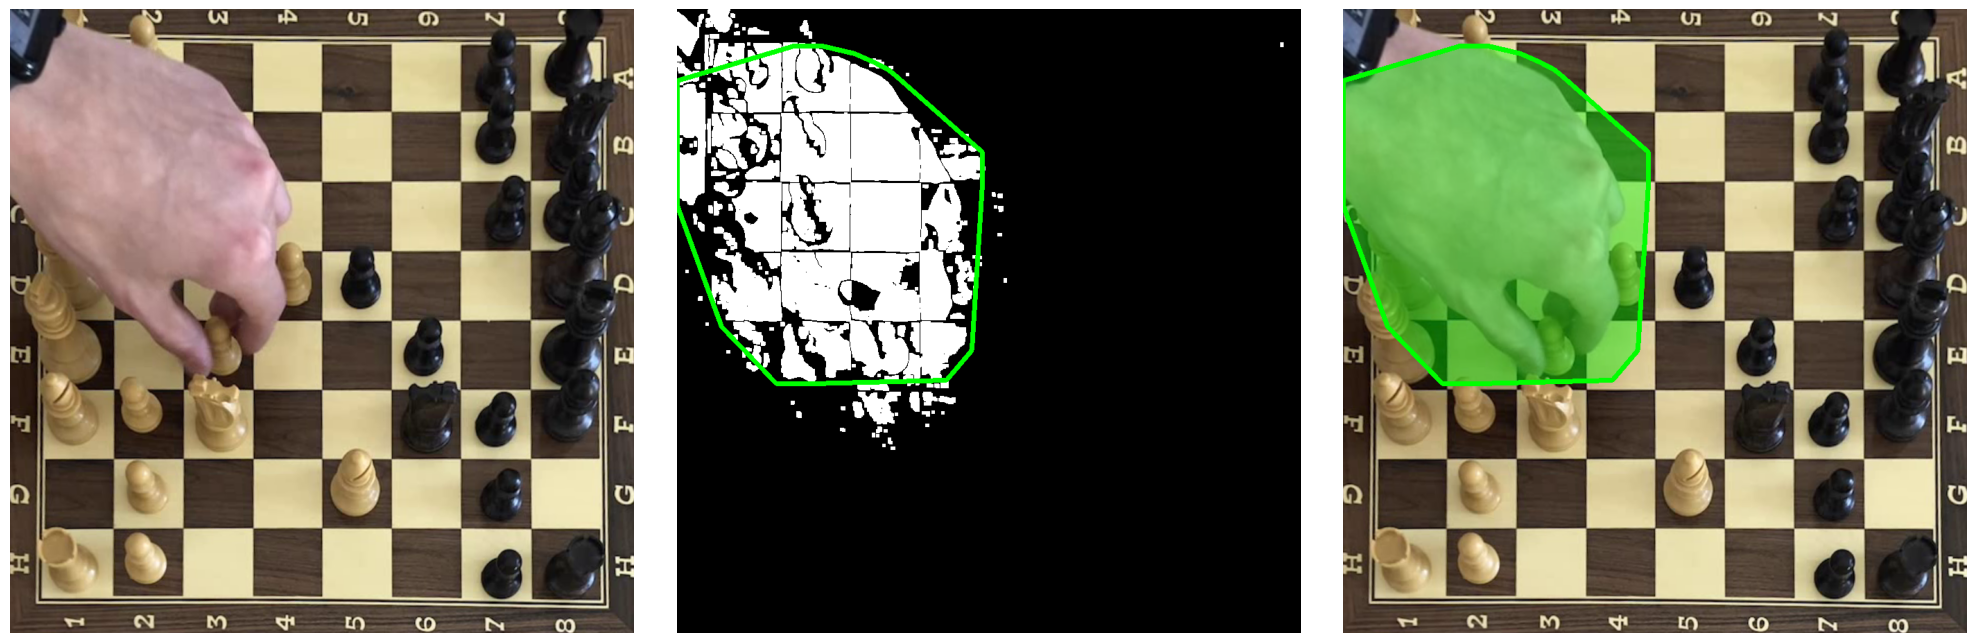
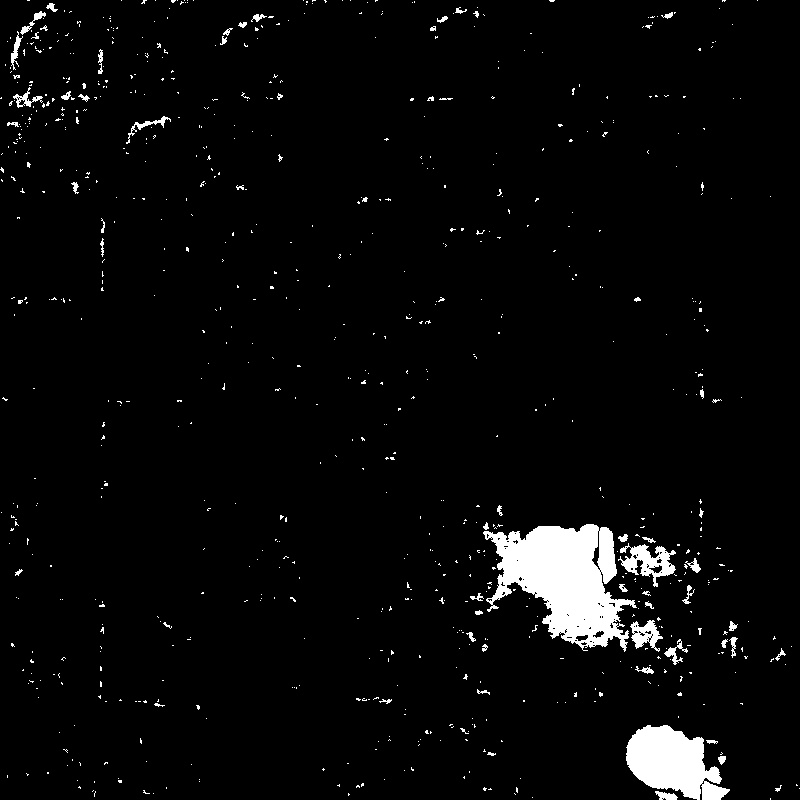
To determine when a move is made, we focus on when the player’s hand overlaps with the chessboard, moves a piece, and then exits the frame. This is achieved using a technique called background subtraction, implemented with OpenCV. Background subtraction works by comparing consecutive frames and generating a mask, as shown in the image below.
As you can see, the cropped area of the chessboard used for hand detection is larger than the standard area used for piece detection. This adjustment was made because during testing, it was observed that moves on the row of the chessboard closest to the player—where the intersection area between the hand and the board is minimal—posed a risk of failing to detect the hand. By expanding the hand detection area, errors are significantly reduced.
In the mask:
- Black pixels represent static objects — the background that hasn’t changed between frames (like the table and chessboard).
- White pixels represent changes between frames, which in this case indicates dynamic objects, such as the player’s hand.
Since the table and chessboard don’t move during the game, they are considered static objects and are not detected as changes. Similarly, chess pieces are moved one at a time, and once they settle in a new position, they remain static for several seconds, so they too are not identified as dynamic changes.
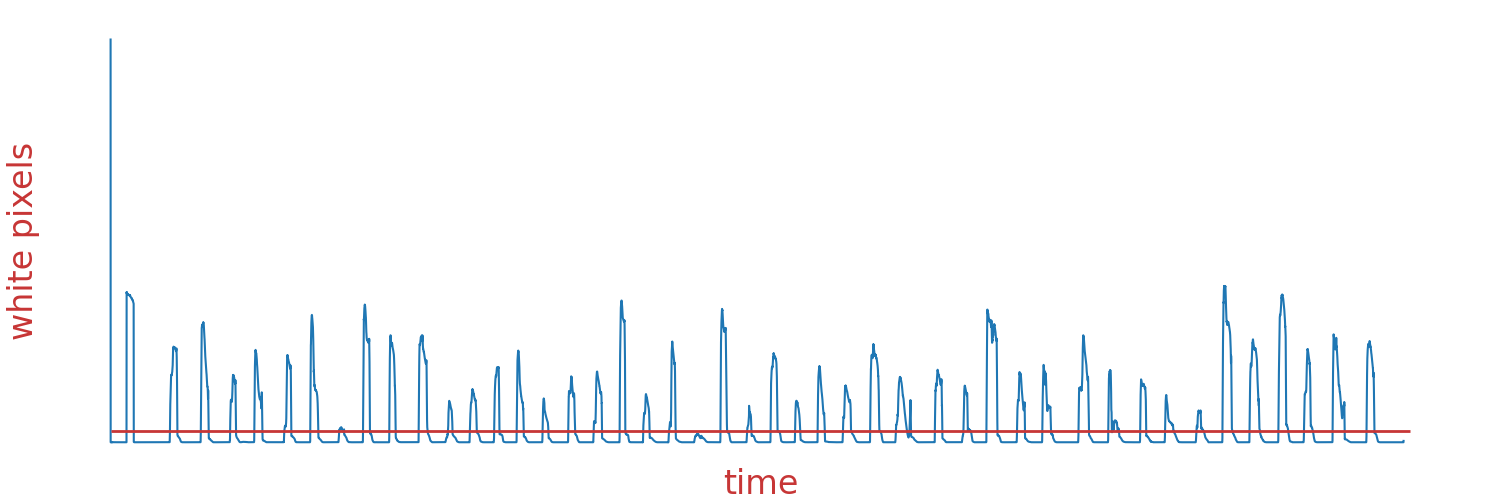
Therefore, the only truly dynamic object in the video is the player’s hand. When the hand overlaps with the chessboard, we can detect it by isolating the white pixel area in the mask. By counting the white pixels and comparing the count to a threshold, we can determine when the hand enters and exits the frame.
The graph below shows the number of white pixels in the mask over the course of an entire game. The sharp spikes indicate the moments when the player’s hand enters and exits the frame, corresponding to the action of moving pieces. The red horizontal line is the threshold I set.
Note:
In an initial attempt to detect chess moves, a more traditional computer vision approach based on frame subtraction (with or without using a background subtractor) was tested. While this method initially showed promising results, it was later replaced by an alternative approach involving a classifier, which demonstrated greater accuracy and reliability. In the following images, you can see, from left to right: the captured image after the move, the frame subtraction result obtained using background subtraction, and finally, a heatmap generated by me to track the played move.
-
Classification
When the hand leaves the frame, we assume a move has been played and a key frame is captured for analysis. The next challenge is to determine the positions of the pieces by classifying each square on the chessboard to identify whether it contains a white piece, a black piece, or is empty.
To tackle this, I trained a classifier using data obtained from images of individual chessboard squares. Specifically, the features used for classification are:
- Color of the square, which is known after calibration.
- Entropy, a value representing the distribution of the grayscale histogram.
- 9 grayscale histograms, calculated for each square divided into a 3x3 grid.
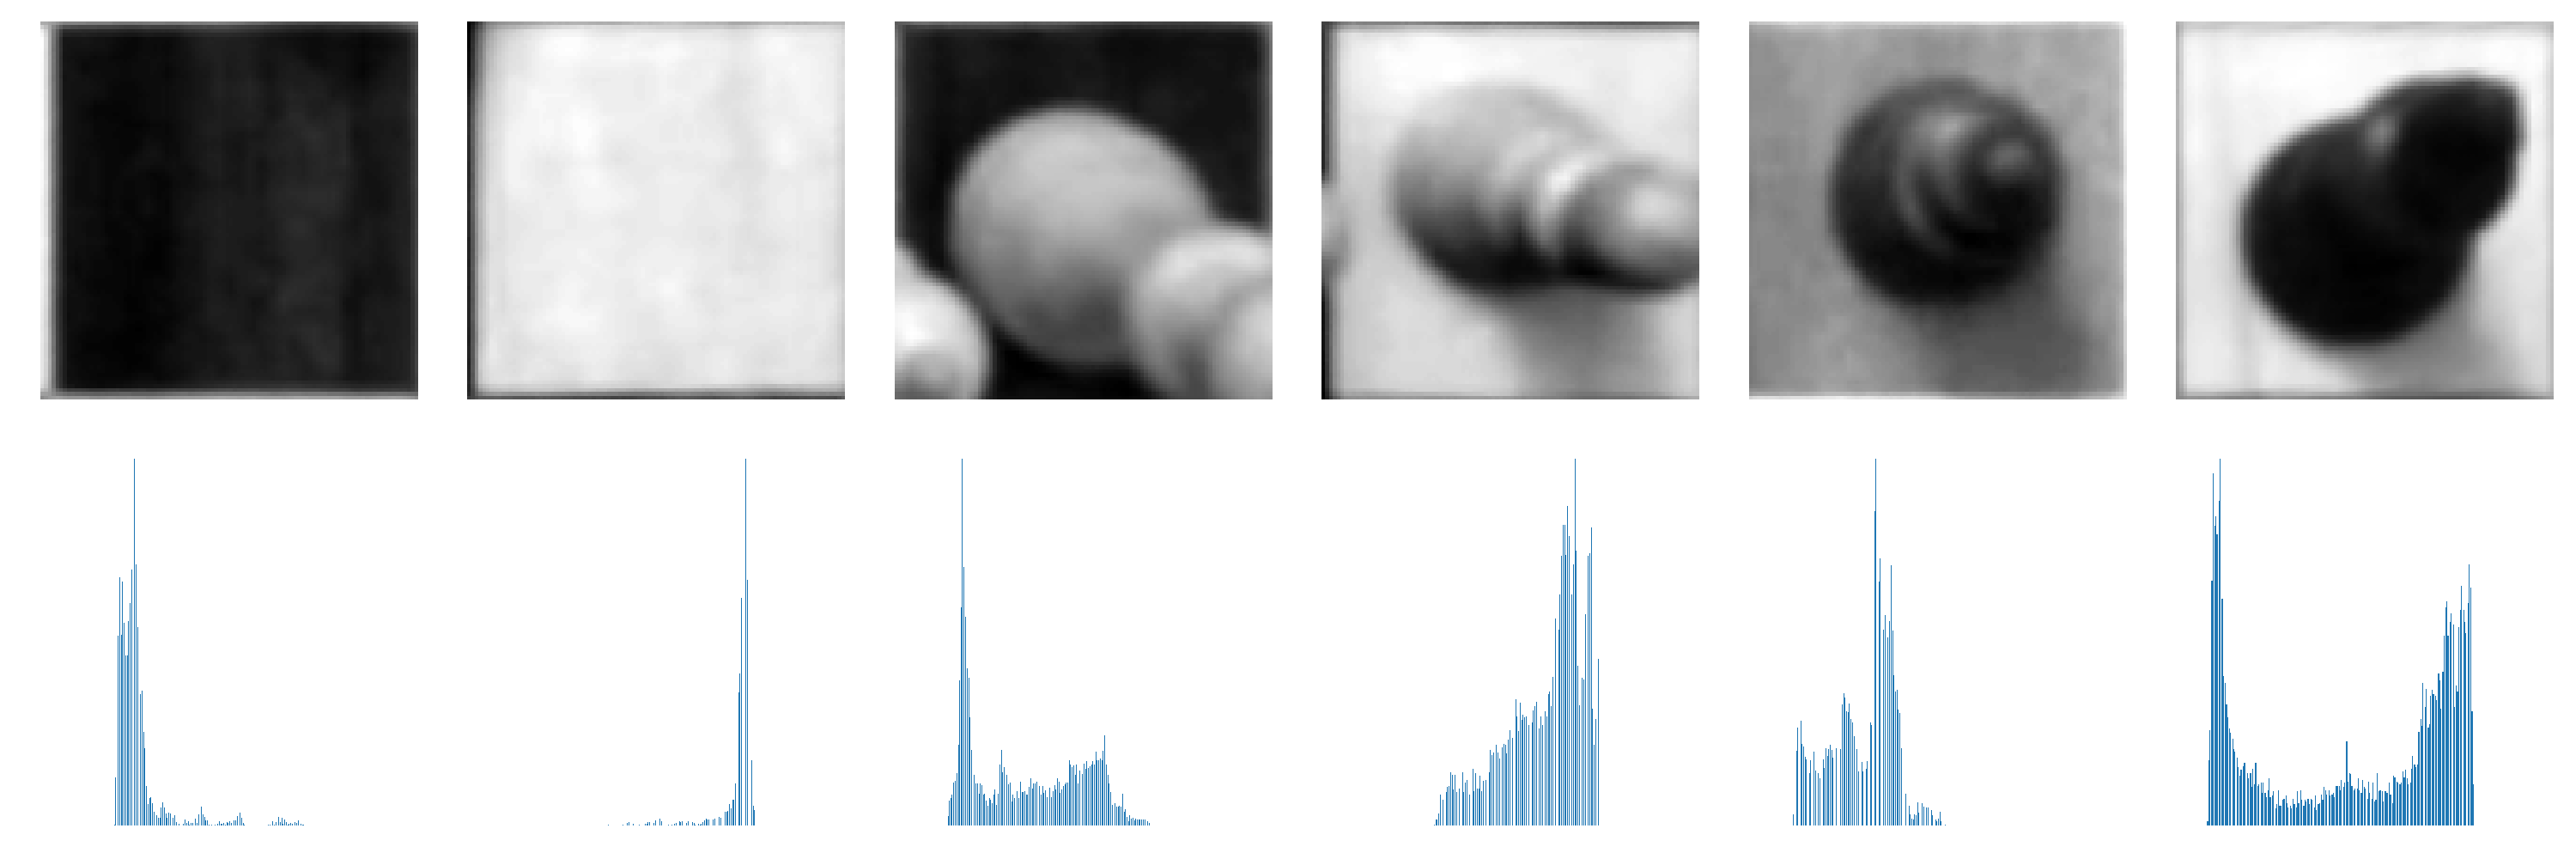
The image above shows the histogram differences for each possible case. However, as mentioned earlier, each square has been divided into 9 smaller sections, and the grayscale histogram is calculated for each of them. This helps the classifier distinguish between squares that contain pieces and those that only have the projection of an adjacent piece. Since we’ve applied a perspective transformation and the camera is not perfectly aligned above the board, but positioned at an angle, tall pieces like rooks and queens may project their top (head) onto adjacent squares. The classifier must be able to correctly differentiate these projections from the actual presence of pieces.
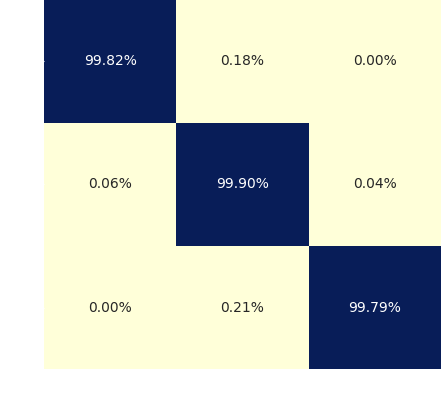
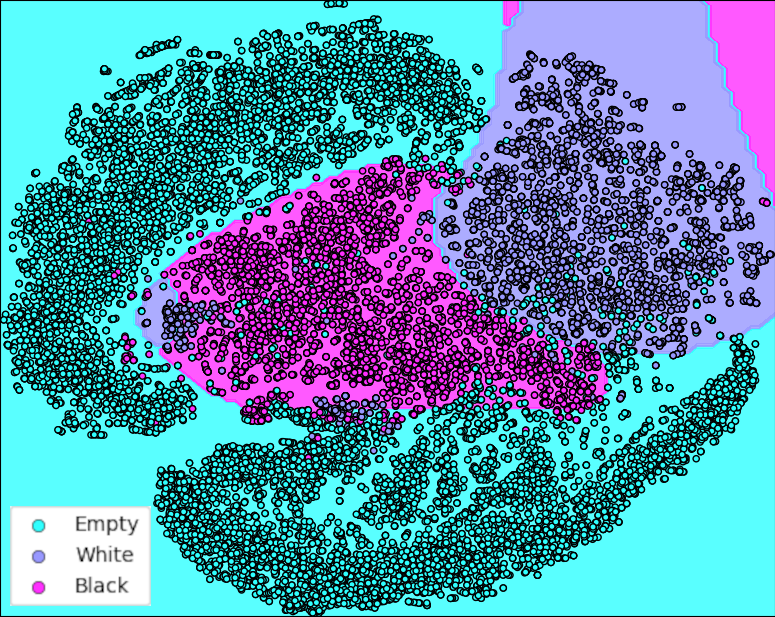
I created a dataset of approximately 150.000 images of individual squares, extracted the relevant features, and split them into training and test sets. Using this data, I trained a Support Vector Classifier (SVC) with an RBF kernel (Radial Basis Function). After testing several models with different kernels, the RBF kernel yielded the highest accuracy, achieving over 99% accuracy.
The image on the left shows the confusion matrix, while the plot on the right visualizes the training data in a 2D space using the t-SNE algorithm. The background colors of the image represent an approximation of the classifier’s decision boundaries.
-
Move Detection
Now that we are able to classify each square on the chessboard, we can proceed to identify the move. To do this, we compare the positions of the pieces before the move was made with the new positions obtained through classification.
5.1 Generating the Bitmap
We generate a bitmap, which is essentially a matrix of bits. In this bitmap:
- 1s represent the positions of the black pieces (since, in this example, it’s Black’s turn to move).
- 0s represent the positions of the white pieces and empty squares.
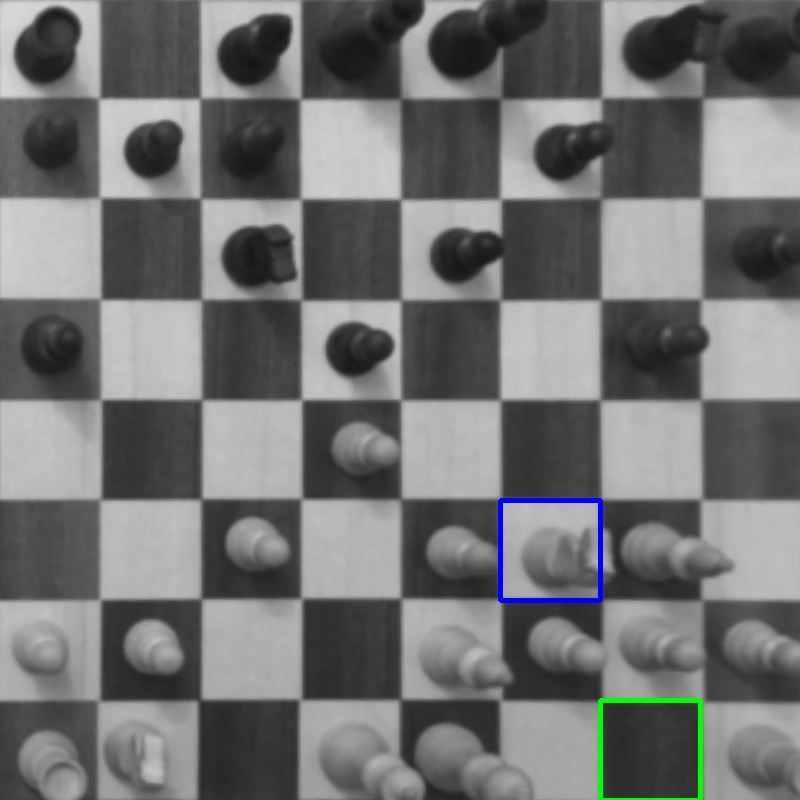
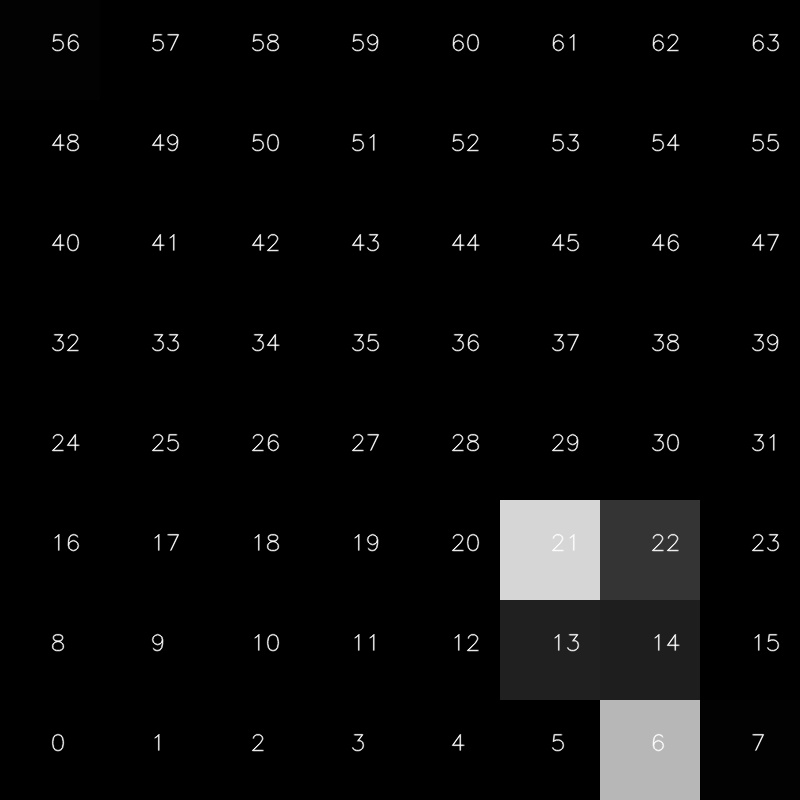
5.2. XOR Operation for Change Detection
We then perform a XOR operation between the bitmap representing the previous position and the one obtained from the classifier. This results in the matrix shown in the bottom-right corner, which highlights the squares that have undergone a state change.
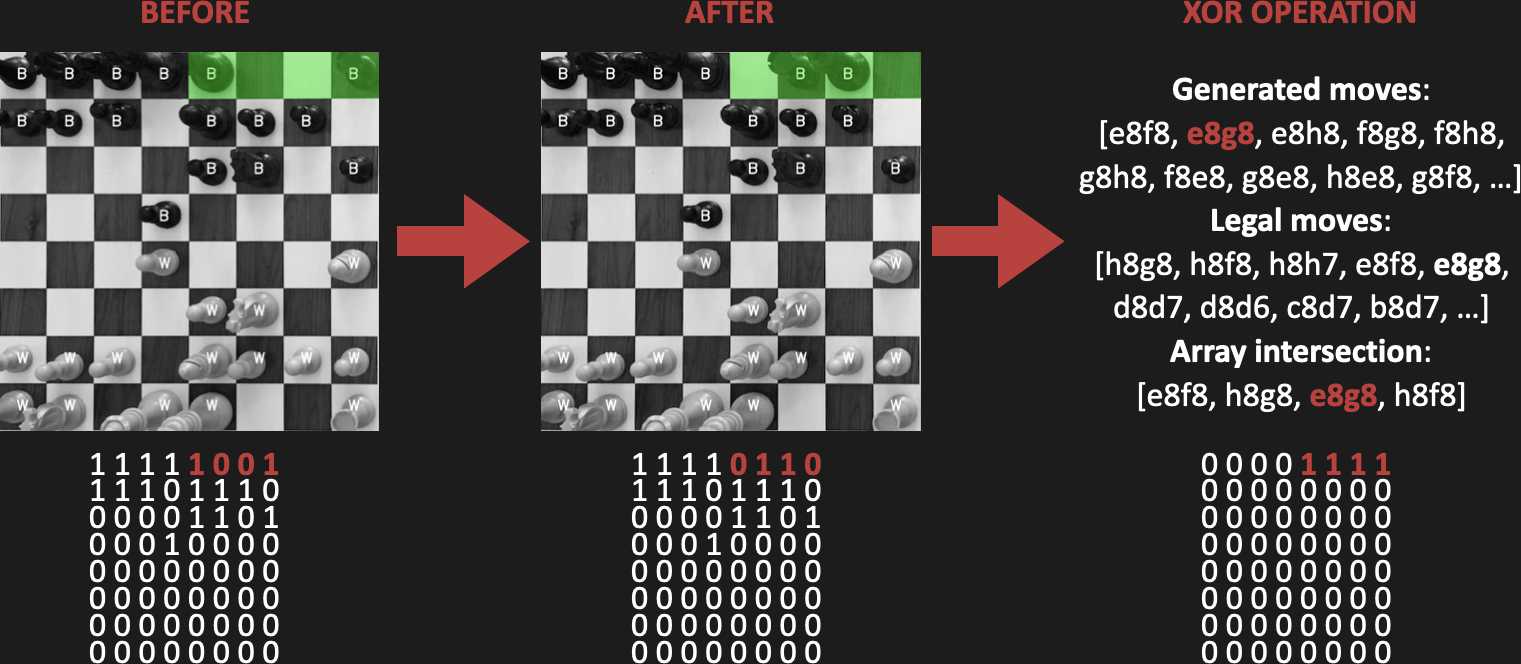
5.3. Generating Possible Moves
From these changed squares, we generate all possible move combinations to and from these positions. This list of moves is then compared with an array containing all legal and rule-compliant moves for the given starting position in chess.
To digitally track the pieces and generate the array of legal moves, we use the Python-chess library.
This process produces a final array that can have one of the following outcomes:
-
Empty, if no move was made (e.g., when a player touches the board but doesn’t move any pieces).
-
Contains one move, if the move was correctly detected.
-
Contains multiple moves, as in the case of castling. In this scenario, the program recognizes the ‘special’ configuration of the bitmap and chooses to execute the castling move.
Handling Ambiguities
There are cases where ambiguities may arise, typically between two possible moves, usually due to classification errors. In such situations, we consult the chess engine Stockfish to determine which of the ambiguous moves is the best. Given the probabilities, we expect the player to have chosen the better move over a weaker one.
-
Demo Video
https://github.com/user-attachments/assets/b63cb926-42d6-421d-888c-b2f979801ecd
-
Conclusions
The program operates in real-time on conventional hardware, such as a mid-range computer, as it does not require extensive processing time. However, in non-standard or unconventional lighting conditions or camera placements—for example, outdoor settings with intense sunlight or indoor settings with dim lighting—the classifier may make errors that prevent it from accurately detecting moves. This highlights an area for future improvement: expanding and diversifying the dataset to make the classifier more robust.
7.1 Future Improvements
-
Enhanced Board Detection Algorithm:
Implement a new algorithm for board detection that can work with pieces on the board. This would allow the chessboard or camera to be moved during the game, whereas currently, they must remain fixed. -
Improved User Interface:
Develop a more engaging and user-friendly graphical interface to enhance the overall user experience. -
Integration with Online Platforms:
Implement lichess.org APIs to enable users to play against real opponents online using their physical chessboard and a simple webcam. This would bridge the gap between physical and online chess, offering a seamless experience.
-
📂 Project structure
$PROJECT_ROOT
│   # Classifier folder and script
├── classifier
│   │   # Image dataset folder
│   ├── dataset
│   │   # Script to train classifier
│   ├── ckassifier.ipynb
│   │   # Script to generate dataset
│   ├── square_img_generator.py
│   │   # Trained classifiers and scalers
│   └── *.pkl
│
│   # Summary jupyter notebook
├── summary
│   │   # File summarizing process steps
│   └── main.ipynb
│
│   # Old python files
├── old
│   └── *
│
│   # Main program file
└── main.py
▶️ How to try it
Running the Program with Pre-Trained Models:
-
Clone the GitHub Repository:
- Start by cloning the Github repository to your local machine.
-
(Optional) Create a Python Virtual Environment:
-
Run the following commands in your terminal:
python -m venv venv_name
# On Windows:
venv_name\Scripts\activate
# On Linux or Mac:
source venv_name/bin/activate
-
-
Install Dependencies:
-
Install the required dependencies by running:
pip install -r requirements.txt
-
-
Run the Program:
-
Finally, start the program by executing:
python main.py
-
This will set up the environment and launch the program for you to test. It will use the scaler and classifier trained by me.
Training Your Own Classifier
If you want to train your own classifier, follow these steps:
-
Generate a Custom Dataset:
- Record videos of chess games, ensuring that:
- The first few seconds of the video show an empty chessboard for board recognition.
- The chessboard and camera remain fixed throughout the recording.
- Use the script /classifier/square_img_generator.py to extract images of individual chessboard squares after each move.
- Record videos of chess games, ensuring that:
-
Organize the Dataset:
-
Organize the extracted images into folders with the following structure:
/classifier/dataset
│
├── black          # Black piece
│   ├── black_square   # Black chessboard square
│   └── white_square   # White chessboard square
│
├── white          # White piece
│   ├── black_square   # Black chessboard square
│   └── white_square   # White chessboard square
│
└── empty         # Empty square
    ├── black_square   # Black chessboard square
    └── white_square   # White chessboard square
Here,
black, white, empty, andblack_square, white_squarerefers to the classification of each square. -
-
Train the Classifier:
- Use the /classifier/classifier.ipynb notebook to train and save your own scaler and classifier.
This process allows you to create a personalized classifier tailored to your specific setup and conditions.
🔗 Links
-
Automatic chess move recognition github repository (the repository is actually private).